Run, don't walk, to this video series by RF MAN. He is truly, THE MAN! Pete N6QW found this series, passed it to Dean KK4DAS, who alerted me. Thanks guys.
This is a six part video series on how to design an HF 50 watt RF linear amplifier using our beloved IRF-510 MOSFET. Each video is about 30 minutes long.
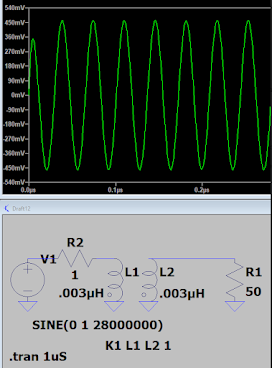
The author (who is this genius?) makes great use of LTSpice. I have been using this software for years, but still I learned a lot by watching these videos: AC Analysis. How to change the values of the things you are measuring. Even something as simple as drawing a wire right through a component to get leads on both sides. This is really useful stuff.
RF Man goes through the whole design of the RF amplifier. He describes how to use LTSpice to determine input and output impedances (he does this with a NanoVNA in another video). He talks about the use of negative feedback, and temperature compensation. There are swamping resistors as Q killers. This is all great, real-world stuff.
Especially useful for me was his presentation on how to do "two tone" IMD tests.
There is a lot to learn here. RF Man has a really wonderful way of explaining complex theory, and demonstrating complex tests. This series makes me want to build a MOSFET amplifier.
Look for the six parts of this series. Here is RF Man's YouTube channel:
Thank you, RF Man!